FreeIPA Server Install
FreeIPA 单节点部署
| Bash |
|---|
| server: 172.26.32.52 centos7.9
jump: 172.26.32.53 centos7.9
|
FreeIPA server 端安装
1、先准备server主机环境
云主机默认不开启IPv6,根据提示,需要在 lo 接口启用IPv6,编辑/etc/sysctl.conf文件,调整或增加:
vim /etc/sysctl.conf
| Bash |
|---|
| net.ipv6.conf.all.disable_ipv6 = 0
net.ipv6.conf.default.disable_ipv6 = 0
|
sysctl -p 刷新一下
不然会报下面的错误:
ipapython.admintool: ERROR    IPv6 stack is enabled in the kernel but there is no interface that has ::1 address assigned. Add ::1 address resolution to 'lo' interface. You might need to enable IPv6 on the interface 'lo' in sysctl.conf.
ipapython.admintool: ERROR    The ipa-server-install command failed. See /var/log/ipaserver-install.log for more information
配置时间服务chronyd,所有加入IPA- server的主机时间需要保持一致,一般配置server 为时间服务器
vim /etc/chrony.conf
因使用的阿里云主机,默认指向阿里云的时间服务器地址,这里不做服务配置,仅开启时间同步即可
| Bash |
|---|
| chronyc sources -v
systemctl enable chronyd
systemctl restart chronyd
systemctl status chronyd
|
配置主机名
| Bash |
|---|
| hostnamectl set-hostname server.ipa.vip
echo "172.26.32.52 server.ipa.vip server" >> /etc/hosts
|
2、准备安装server
升级nss 版本
yum update nss-3.90.0-2.el7_9
安装一些工具
yum install -y nmon iftop nc tree mtr tmux screen iotop ntop nmap python-pip python-devel gcc make autoconf unzip automake gcc-c++ lrzsz rpcbind net-tools bind-utils
安装ipa-server,主要关注bind版本,centos7.9最新版为bind-9.11.4-26.P2.el7_9.16,此版本不兼容现在的ipa-server-dns,所以需要降级bind及其相关包到bind-9.11.4-26.P2.el7_9.8
| Bash |
|---|
| yum install \
ipa-server-4.6.8-5.el7.centos.17 \
ipa-server-dns-4.6.8-5.el7.centos.17 \
bind-dyndb-ldap-11.1-7.el7_9.1 \
bind-9.11.4-26.P2.el7_9.8 \
bind-libs-9.11.4-26.P2.el7_9.8 \
bind-libs-lite-9.11.4-26.P2.el7_9.8 \
bind-license-9.11.4-26.P2.el7_9.8 \
bind-pkcs11-9.11.4-26.P2.el7_9.8 \
bind-pkcs11-libs-9.11.4-26.P2.el7_9.8
|
3、配置ipa-server
| Bash |
|---|
| ipa-server-install \
--hostname=server.ipa.vip \
--domain=ipa.vip \
--realm=IPA.VIP \
--admin-password=xxxxxxxx \
--ds-password=xxxxxxxx \
--master-password=xxxxxxxx \
--setup-dns \
--no-dnssec-validation \
--forward-policy=only \
--forwarder=172.26.32.48 \
--forwarder=172.26.32.53 \
--allow-zone-overlap \
--unattended
...
The ipa-client-install command was successful
==============================================================================
Setup complete
Next steps:
1. You must make sure these network ports are open:
TCP Ports:
* 80, 443: HTTP/HTTPS
* 389, 636: LDAP/LDAPS
* 88, 464: kerberos
* 53: bind
UDP Ports:
* 88, 464: kerberos
* 53: bind
* 123: ntp
2. You can now obtain a kerberos ticket using the command: 'kinit admin'
This ticket will allow you to use the IPA tools (e.g., ipa user-add)
and the web user interface.
Be sure to back up the CA certificates stored in /root/cacert.p12
These files are required to create replicas. The password for these
files is the Directory Manager password
|
以上server 端安装结束,可以使用命令验证
| Bash |
|---|
| root@pts/0 # kinit admin
Password for admin@IPA.VIP: #密码就是上边的--admin-password
root@pts/0 # ipa user-find admin
-------
已匹配1个用户
-------
用户登录名: admin
姓: Administrator
主目录: /home/admin
登录shell: /bin/bash
主体别名: admin@IPA.VIP
UID: 1046600000
GID: 1046600000
禁用账户: False
--------
返回的条目数 1
--------
|
此时ipa-server已安装完成
在内部DNS服务器 172.26.32.48 / 172.26.32.53 分别添加域名转发
| Bash |
|---|
| zone "ipa.vip" IN {
type forward;
forward only;
forwarders {
172.26.32.52;
};
};
|
可通过浏览器访问
https://server.ipa.vip
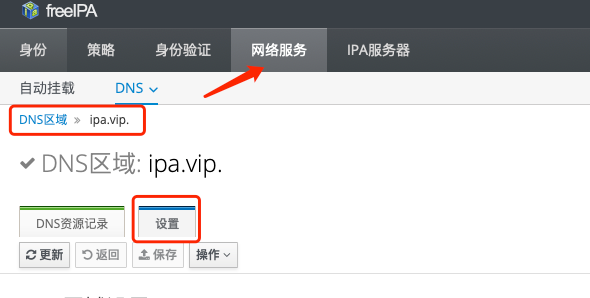
4、阻止DNS放大攻击
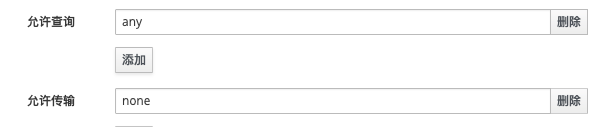
IdM所集成dns的默认配置是允许所有客户端向dns服务做递归查询
图形界面配置
修改之前
修改之后
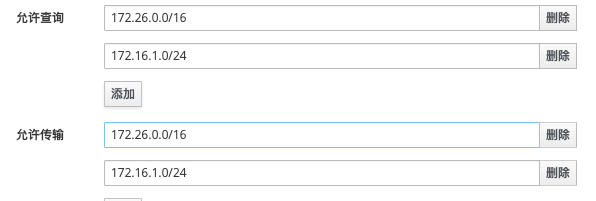
点击上边的保存即可
ipa-server-install 参数含义
| Bash |
|---|
| Options:
-U, --unattended:在安装过程中无人值守
Basic options:
-a ADMIN_PASSWORD, --admin-password=ADMIN_PASSWORD:指定管理员密码
-p DM_PASSWORD, --ds-password=DM_PASSWORD:指定主机密钥,用于只有授权的机器才能连接 FreeIPA 服务器
-n DOMAIN_NAME, --domain=DOMAIN_NAME:IPA部署的DNS主域(非必须与当前主机名相关)
-r REALM_NAME, --realm=REALM_NAME:IPA部署的Kerberos领域名称(通常为主DNS域的大写名称)
--hostname=HOST_NAME :此主机的完全限定名称
Server options:
--setup-dns:安装过程中设置 DNS,配置 FreeIPA 服务器为 DNS 服务器
Client options:
--mkhomedir:用户首次登录自动创建用户的家目录
DNS options:
--no-forwarders:禁止 DNS 转发,配合 --setup-dns 使用
--forwarder=FORWARDERS :添加DNS转发器。此选项可以多次使用次
--allow-zone-overlap :创建DNS区域,即使它已经存在
--reverse-zone=REVERSE_ZONE :要使用的反向DNS区域。可以使用此选项多次
--no-reverse :不创建新的反向DNS区域
--auto-reverse :创建必要的反向区域
--zonemgr=ZONEMGR :DNS区域管理器电子邮件地址。默认为hostmaster@DOMAIN
--auto-forwarders :使用/etc/resolv.conf中配置的DNS转发器
--forward-policy={first,only} :全局转发器的DNS转发策略
--no-dnssec-validation :禁用DNSSEC验证
|